


Managing a network becomes challenging when you have many devices but only one Ethernet port available. Whether it’s a home setup or a growing office environment, the need to expand connectivity from a single port is extremely common. Most routers provide limited Ethernet ports, and when those run out, people often assume they need expensive infrastructure upgrades. The good news is — with the right tools and methods, expanding from a single Ethernet port is completely achievable without sacrificing performance, reliability, or spending a fortune.
What Is a Network Switch?
A network switch is a hardware device that connects multiple devices within a local area network (LAN). Unlike a router, it doesn’t manage internet traffic — it simply directs data packets between connected devices intelligently and efficiently. Switches come in various sizes, typically offering 5, 8, 16, 24, or 48 ports, and they serve as the true backbone of any wired network. Understanding how a switch works is the first step toward building a well-structured and high-performing network.
Why Would You Need This Setup?
You might have a single Ethernet wall outlet in a room but need to connect a desktop, printer, smart TV, NAS drive, and IP phone all at once. In office environments, a single uplink cable from the main router must serve an entire floor full of workstations, printers, and conference room equipment. In data centers and server rooms, bandwidth efficiency and port management are mission-critical concerns. Understanding how to expand one Ethernet port into many is a fundamental and practical networking skill that saves both time and money at every level — from home users to IT professionals.
Using a Network Switch
This is the simplest and most common solution available. You plug a network switch directly into your single Ethernet port, and it instantly multiplies your available connections without any complex configuration. A single 8-port switch, for example, gives you 7 usable device ports from just one Ethernet source — no software setup needed, just plug and play.
How to set it up:
- Connect one end of an Ethernet cable to your router’s available port.
- Plug the other end into the uplink or any port on your network switch.
- Connect your individual devices into the remaining ports on the switch.
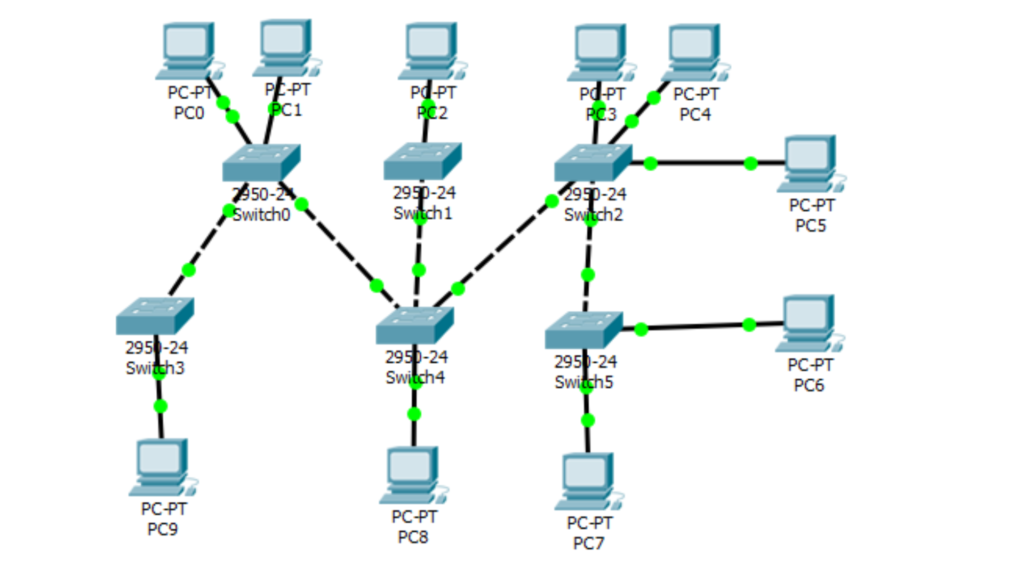
Daisy Chaining Multiple Switches
When one switch isn’t enough, daisy chaining lets you connect one switch to another in a sequential line, expanding your total available ports even further. Each switch in the chain multiplies your connections, making it a flexible and cost-effective solution for growing networks that need more device support over time. However, it is strongly recommended not to exceed three switches in a single daisy chain, as each additional switch introduces latency and can noticeably degrade overall network speed and stability.
Using an Uplink Port for Cascading
Most managed and semi-managed switches include a dedicated uplink port that is specifically designed to connect one switch to another or directly to a router. This uplink port handles higher bandwidth than standard ports, which helps reduce network bottlenecks and keeps data flowing smoothly across connected devices. Cascading via uplink ports is a cleaner and more structured approach compared to basic daisy chaining, and it is better suited for medium-sized offices or businesses where consistent performance is important throughout the day.
VLAN Trunking
VLAN (Virtual Local Area Network) trunking is an advanced technique that allows multiple VLANs to pass traffic simultaneously through a single physical Ethernet link. It makes your single connection incredibly efficient by logically segmenting your network traffic without needing additional physical cables or ports. Alongside efficiency, VLAN trunking significantly improves network security by isolating different departments, devices, or user groups from each other. You will need a managed switch to configure VLANs properly — basic unmanaged switches simply do not support this feature and cannot be configured at this level.
Link Aggregation
Link aggregation, also known as port bonding or port trunking, combines multiple physical Ethernet ports into one single logical high-speed connection between two switches or devices. It not only increases total available bandwidth but also provides automatic redundancy — if one physical cable fails, the remaining cables continue carrying network traffic without any interruption or manual intervention. This method requires managed switches that support the IEEE 802.3ad standard and is particularly ideal for servers, NAS devices, video editing workstations, and any environment where high and consistent data throughput is absolutely critical.
Choosing the Right Switch
Choosing the right switch depends entirely on your network size, complexity, and long-term goals. An unmanaged switch is perfect for simple home setups where plug-and-play convenience matters most. A smart switch suits small businesses that need basic traffic monitoring and VLAN support without the complexity of full management. A fully managed switch is built for enterprise environments requiring complete control over every port, VLAN, QoS setting, and security policy. Always match the switch’s speed rating to your router — using a slower switch anywhere in the chain creates a bottleneck that limits the performance of your entire network.
Important Tips Before You Start
Before building or expanding your network, keep these key points in mind:
- Always use Cat6 or Cat6a Ethernet cables for better speed, reliability, and future-proofing.
- Enable Spanning Tree Protocol (STP) on managed switches to automatically prevent dangerous network loops.
- Avoid mixing 10/100 Mbps and Gigabit switches in the same chain — the slowest device drags down the entire network.
- Label every cable clearly in complex setups to make future troubleshooting significantly faster and easier.
Common Mistakes to Avoid
Many people unknowingly create serious problems by connecting switches without a proper uplink port, which causes network loops that can crash the entire setup within seconds. Others make the mistake of daisy chaining too many switches, ignoring PoE requirements for powered devices, or forgetting to regularly update switch firmware — all of which lead to slow performance, dropped connections, and security vulnerabilities. Taking time to plan your network layout before running cables saves enormous amounts of time, frustration, and unnecessary cost in the long run.
Final Thoughts
Connecting numerous network switch ports to one Ethernet port is coxmpletely achievable with the right approach and the right equipment. Whether you choose a simple plug-and-play switch, daisy chaining, uplink cascading, VLAN trunking, or link aggregation — there is a method perfectly suited for every scenario, network size, and budget. Start with the simplest solution that meets your current needs and scale up gradually as your network grows. A well-planned and properly structured network gives you full control over your infrastructure today and adapts smoothly to whatever demands come tomorrow.